
Welcome to the third part of the
dynamic hair tutorial, by me, if you have not checked out part one or two of
the tutorial, check it out here: PART 1, PART 2.
In part 1, we have gone through
setting up the mesh needed (skinned to joints) for a dynamic hair
simulation, and also went through the setting up of curves for the
dynamic hair system.
In part 2, we have gone through the connections, connecting the curves
and joints and the mesh.In this part 3, we will be going through setting up the collisions of the hair curves and some of the more important settings (that I felt was) of the hair system.
Please make sure you have your part done file that you used for the previous tutorial.
To start off, load up your file (if you have closed it) and check that you have the following items from the previous tutorial:
In the GEO_GRP:
Mesh (model/object)
In the Rig_GRP:
Joint chain (skinned to mesh)
Hair follicles (in the master joint)
inputCurves (child of their respective hair follicles)
In its own hairSystem_GRP:
Output hair curves (not the same as the original curves)
Hair systems

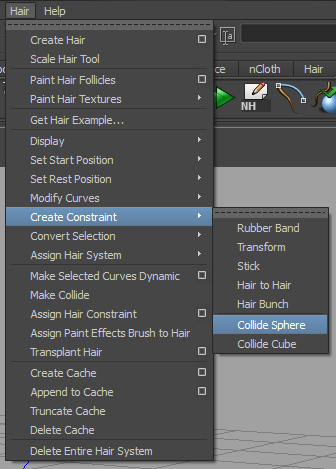
For this lesson, all you need are the curves (either inputCurves or your outputCurves, pick one), and go to: Hair>Create Constraint>Collide Sphere
Do take note creating collide spheres/cubes (whichever suits your needs) you can only select a curve at a time and have a collide sphere/cube for a curve. However. you can have more than 1 constraint to a curve.
 |
| Rescaling of collide sphere. |
 |
| A better perspective of the collide sphere following the curvature of the curve. |
So do all the collide spheres for all the curves and...
 |
| You should get something like this. |
Parent the constraints under the master joint (or any control in the rig that controls the master joint) because you want the collide spheres to move with the head and not stay there when the head moves.
I made a controller and a head joint (supposedly I followed how I would have rigged a full character [but then again the mesh is pass the origin on the negative side {for tutorial purposes only}]. I have provided a full expansion view of my outliner, just for you to check and if you have any questions, you may comment or send me a mail.

As you can see, the hair is pretty crazy, we would not want them to fling about when the character is being animated (please take note that, I did not create this in scale, also I do not think that correct scale is required).
I will be talking about the hairSystem settings and attributes (the ones which are of more importance).
 |
| Dynamics tab in the hairSystem |
#1 Iterations
Iterations controls the repetitions per time step of the hair solver, the higher the value, the more the hairSystem will calculate on the stiffness and the length flex, increasing accuracy and the cost of the simulation.
#2 Length Flex
Basically how much the hair curve can stretch along its length.
#3 Stiffness
Well, as the name suggests, it controls whether the hair curve is flexible or not.
#3.5 Stiffness Scale
Left to right: root of hair to tip of hair (start of hair curve to end of hair curve)
Down to up: not stiff to stiff
#4 Forces tab

#4.5 Mass
Mass defines the mass (amount of matter in the hair), or if you want (although not scientifically equal), the weight of the hair.
That kind of sums up what I use overall. There are some attributes that you want to explore, those are fine even if it is in its default values.
 |
| Collisions and Turbulence is worth checking out. |
I might be doing an extra tutorial continuing this one (like an extra part) talking about FK-ing this hair after being simulated to allow more control over the hair for animators.
You can get my working file here:

If you have any questions, you can leave a comment or you can send an e-mail to me. Thank you for your audience.
hei man, awesome tut , thx bunch for sharing it :) I'm using Maya ver.2013 and I'm having some problems with the collision part of the tutorial. Ui is somewhat different so for start this Maya has something which is called NHair ( nucleus I guess ) while in DYNAMICS tab and I used that during initial stages. Now, my issue is with collision spheres, or to be more exact, there is no collision taking place, collision spheres stay frozen in place or just follow the main controller without affecting anything :( sry, dunno how to explain it better, hope you got something from it..many thx, all best.Nikola
ReplyDeleteHey, thanks for the compliment. Thing is, if I remember correctly, I did this when Maya was in its 2012 version, now I am using the 2014 version. However, I do know what you are talking about, the changes came in around 2013 edition of Maya.
DeleteFirst up, the 2013 edition if I remember correctly, took away the "old school" dynamics and integrated it within the Nucleus Dynamics (nDynamics). That is why the dynamics collision spheres did not work out.
Secondly, there is a workaround (more like another method), using the collision from nMesh. This is quite important since the yearly updates improved on the dynamics improving on the nDynamics.
Lastly, here is what you do:
1. Create a mesh or NURBS (I don't really do work with NURBS, since I do mini films [student time], they should work)
2. Go under "nDynamics" menu and click on the "nMesh" menu, you will see there is an option for passive collider. What it does is the same thing that a collision sphere will do, just that you can alter the object. Then again, the calculations are based off the faces your collider mesh has, so keep it low if you want to have simulations process faster. (I recommend a plane, make sure the normals are pointed facing the collision side.)
3. You can edit the many collision attributes once you have created the solver, many collision mesh can fall under a same solver (change one attribute and you edit them all!! Good if you want to quickly edit things throughout the whole simulation)
Yeap that is about it, really appreciate your kind words, and really glad to help, although I am around... 2 weeks late, hope you are still there (real sorry about that).
If you have any questions, please blast them on the blog, and we shall see if we can work it out!
I use polygon-hair rigged by dynamic curve as chains.Creating collision of curves's OK, but..when i blind skin John hair with polygon, there's no way to create collision between polygon and head (or other meshes).
ReplyDeleteI've known that some people use conllide spheres and scale them..But you know, i use maya 2016 ex2 so it's not classic hair, it's different .Note: I use polygon, not create nhair and i don't want hair polygons to penetrate the body
Please help me! Thank you so much!!
Sorry for the super late reply, and thanks for looking at my tutorial, hope this is still relavant.
ReplyDeleteTo my understanding, you are trying to NOT let the hair penetrate into the head/body. I am also assuming that you have followed through my tutorial(its 4 years old now) and I do not really know much about maya 2016, I think they deemed the classic dynamic system and boot it out of the system. Thus, what is left now is the nDynamic system. Since you said you did not create nHair, I am not entirely sure how you are even doing your collision detection, since you also said that it's not classic hair.
The basics of rigging, for that matter does not take into account collision/clipping issues, that is where the simulation part comes in, the simulation (dynamic or nDynamic) will cover the psudo-collision with polygons. I say psudo because the collision do not happen with the polygons, but with the colliders within the dynamics system. There should be a way to implement it in the 2016 version.
I'm afraid I could not provide you with any other details as I really do not own maya 2016, but I do hope that my (late) reply can help enlighten you on this subject.
Hello! You helped me a lot. I first encountered this problem. But according to your lessons I managed to do it. I use Maya 2018.
ReplyDelete